Thursday, June 28, 2012

Silkworms

Caitie is tutored by a lovely woman, Lorna Wooldridge. She's kind, caring, and understanding while mixing in a good dose of appropriate motivation and discipline. In addition to all the great work she's done with Caitie on reading, Lorna also has a variety of other interests including butterflies and moths.

Each year Lorna raises monarchs and other butterflies. Thanks to her, I've had the opportunity to see some caterpillars I'd never laid eyes on before. This spring Lorna raised Zebra silkworms from eggs she got from Michael Cook, who runs an excellent website on silkworms.

This zebra silkworm appears to inspect its new home before entering the nest.
Read more: http://www.post-gazette.com/stories/local/neighborhoods-north/fifth-graders-bring-scientific-method-to-madness-338139/#ixzz1z5avpbv0


The caterpillars are strikingly lovely with vivid markings. As they get ready to spin their silk cocoon, they prefer a close environment, and toilet paper rolls are perfect. Since Lorna was running short, I offered a bag, as I always have lots. As thanks, she was kind enough to give us several cocoons!


The girls and I anxiously awaited moths for a few weeks. Rather than stifle (kill) the cocoons, as is commonly done to preserve the silk, we let the silkworms complete the lifecycle.

Yesterday the moths emerged! We were so excited! Most of the moths were fine, two males and two females. However, the first to arrive had damaged wings and trouble moving. And one cocoon has yet to yield a moth. The healthy moths set about mating pretty quickly, laying eggs soon afterwards. They're still pairing and laying today.


These guys will live for a just a few days, since they don't have mouths. Then we'll store the eggs until next spring, and hopefully, begin the process again!

If you're local to Northwest NJ, and would like to meet Lorna and learn more about her experience raising butterflies and moths, please be sure to attend her Monarch Migration Workshop on July 6 at the Catherine Dickson Hofman Branch of the Warren County Library in Blairstown, NJ.

Sunday, June 24, 2012

A Confession

Recently, I was cruising Facebook, as I too often do,  when I came across the following meme. It featured Neil deGrasse Tyson, so naturally I stopped in my tracks and read it. Because he is just THAT cool.


Anyway, I confused. I mean, the sun is yellow, right. That's what the textbook told me. And that's what I taught. The sun is a yellow star.

It was at this point that I started to freak out a little See, Tyson is one of my favorite scientists; he's a crazy smart guys. I trust him. He he says the ain't yellow, then I have a major problem. Because I'm been teaching it WRONG!

Now, as to the confession: My earth science isn't that strong. Stronger, perhaps, that the average American, especially when it comes to soil science, but that isn't good enough. I'm a scientist. I'm a TEACHER. I have a responsibility to be correct as often as possible, so that I'm not passing on half-truths to my students. This is a big deal to me. It's why I read a lot of non-fiction and love professional development.

That said, the wonderful thing about learning is that it never stops. So off I went to do some research. I learned that the sun only appears to be yellow to us due to the Earth's atmosphere. The atmosphere scatters the blue light, causing our sun to look more yellow on Earth than it would from space. It is, in fact, a white star, with a temperature of  approximately 6,000 Kelvin. Of course, because the sun has layers of different temperatures, each sends a different wavelength of light and what we see if often this combination, interpreted by our eye, which is itself limited.

Of course, I feel better that lots of people are unsure about the topic and that there is still debate on the matter. I just think that next time I teach the sun, especially middle school or older, we'll start with the color as a question and challenge so that we can explore how complicated the answer really it.

So that is what I learned today.

Monday, June 18, 2012

Bubbles: Art, Science & Mentos

About a week ago I decided that bubbles would be my theme for the Blairstown Farmers Market. I mean, bubbles are a clear winner on a lovely spring day at the market. How could I resist?


First things first: the bubble mix. You can buy some, sure. That's quick and easy, but a bit expensive, especially for large quantities. So I made my own using dish soap, water and bit of vegetable glycerin. Recipes abound online, but I like about a 1:12 ratio of detergent to water with about a teaspoon or two of glycerin per cup of solution, depending on the detergent I've used. You can use corn syrup or sugar to make the bubbles last longer, but I find that makes the mix really sticky and attracts more insects, so I like glycerin instead. No matter what, your bubble mix will get better if you let it sit open overnight, especially if your detergent contains alcohol. That said, I usually don't have the patience to wait.


Great! You've got bubble mix! Now what? Get out the pipe cleaners! Let kids make bubble wands using the pipe cleaners. They'll often make all kinds of creative designs -- heart shaped tops and two-color sticks. After a bit, I like to ask if they get square bubbles form a square wands. Kids will laugh at me and say, "Of course not! You always get a round bubble!" That's when I like to ask, "Why?"


Make them think about it for a while. 

See the Universe is an amazing thing, and it like to be efficient. A sphere allows the greatest volume to be trapped within the smallest surface area. So, you can trap the most air inside a round bubble, as opposed to a square, triangle or trapezoid using the same amount of bubble solution. A bubble wouldn't float long if it was bogged down by extra bubble mix! The surface tension of the bubble mix pulls the bubble into that classic shape. The only way to get a bubble to take another shape is to surround it by other bubbles. If you're looking for some wonderful geometrical studies, calculating and modeling the volume to surface area ratios can be a lot of fun.

Now that you've got bubble mix, there are a lot of fun things you can do. For example, there are instructions for giant bubbles and bouncing bubbles. A friend at the market showed us how to create a bubble foamer, which was a huge hit. We just cut a plastic water bottle to separate the top "funnel" from the bottom. We attached a rag to the open end of the funnel with a rubber band. Dip the rag in bubble mix and blow through the drinking end of your water bottle. Tons of fun!


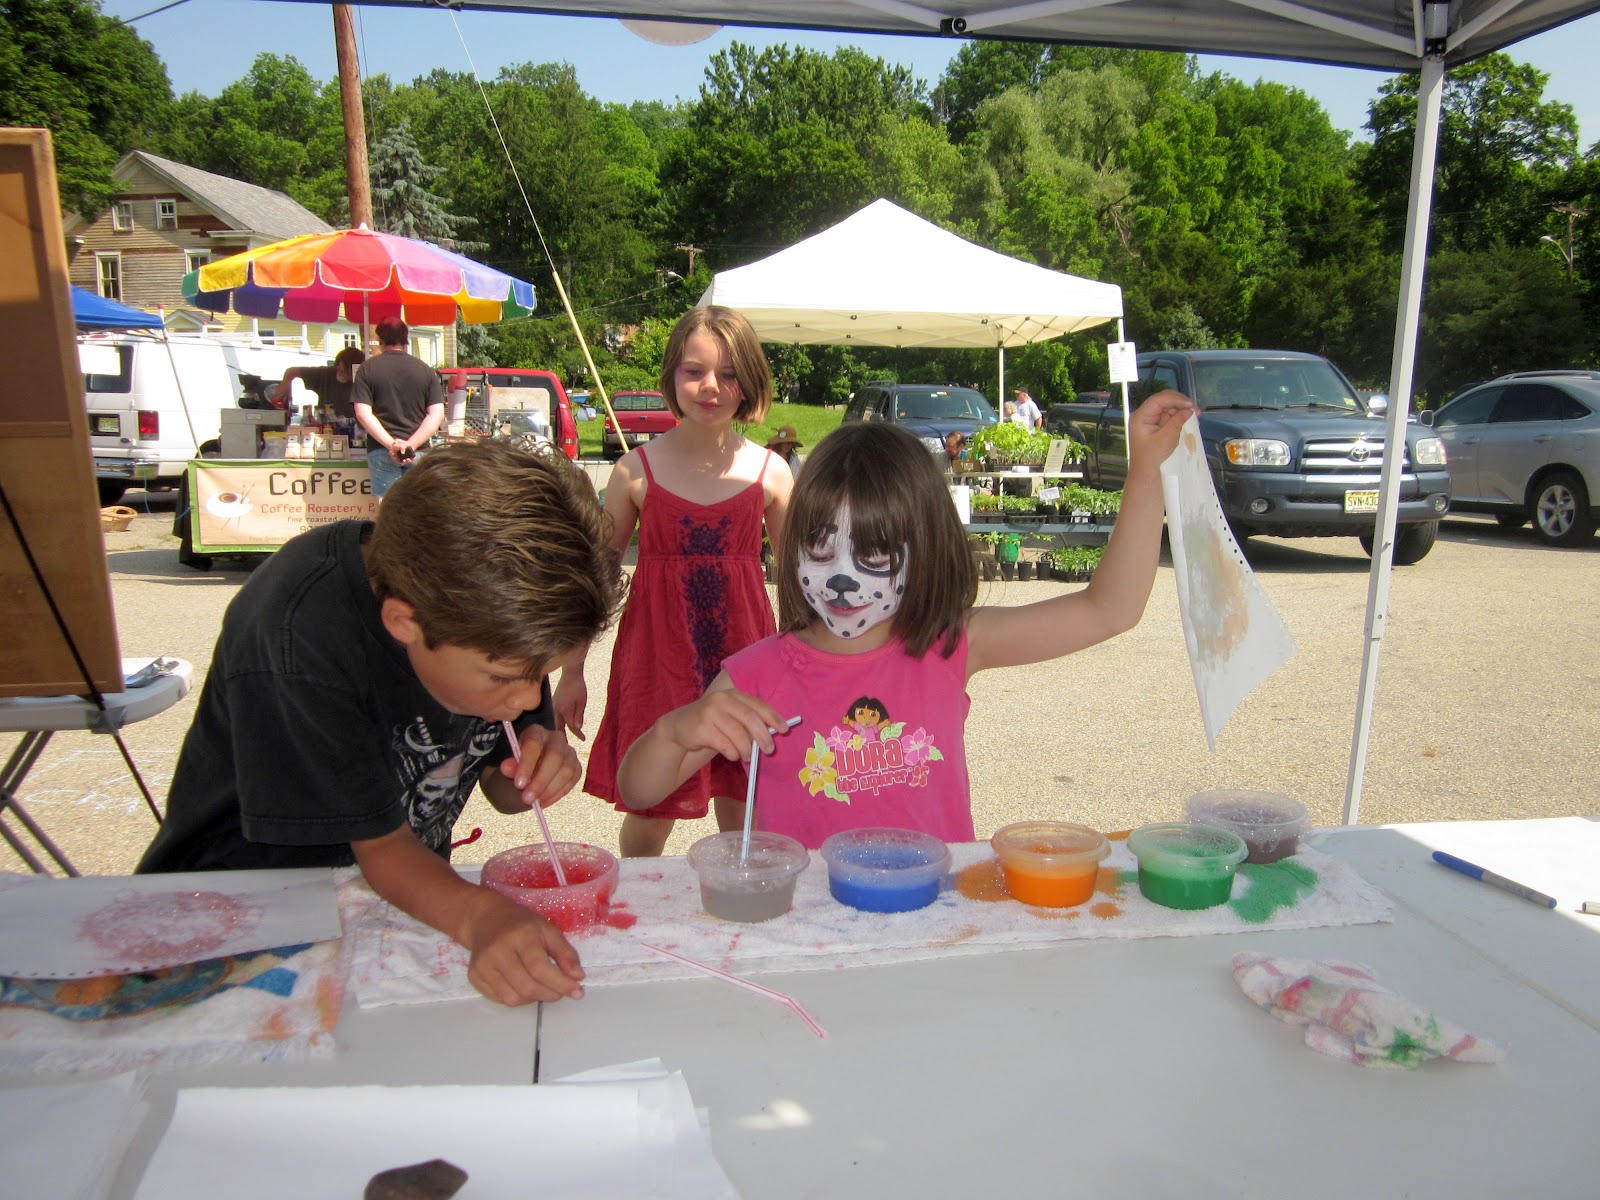
Now, let's move on to art! We did a really simple bubble print project that's easy to set up and really neat. In bowls, I mixed 2-3 tablespoons of washable, non-toxic tempera paint (bright colors work best -- blue, green, orange, red), 1 tablespoon of dish detergent and a 1/2 cup of water. Stir gently. Then, using a straw, blow bubbles in the mixture, letting them rise well above the bowl. Then gently lower a piece of paper onto the bubbles. As they pop they'll leave colorful bursts. You can keep adding bubble prints to fill your page, using many colors and experiment with how fast or slow you blow your bubbles (it can change the size of the bubbles). You can also dip your bubble wand into the mixture and blow onto the paper to create fun patterns that way!


To finish up the day, we made some bubbles in other ways. We combined vinegar and baking soda, a classic chemistry experiment that yields lots of bubbles as carbon dioxide is released. But the real hit was Mentos in diet cola, a la Steve Spangler and Mythbusters The set up is easy: Open a 2-liter bottle of inexpensive diet cola; unwrap a 6-pack of classic Mentos; use index cards to create a tube to hold the Mentos and a slip to cover the top of the bottle; place the slip over the bottle top, the tube on the slip and add the Mentos. When you're ready, pull the slip out and let the Mentos drop into the cola. Then get out of the way quickly!


The result to pretty awesome. Why it works is somewhat up to debate. The links above will review some of the best ideas put forth in detail. Basically the idea is that the dissolving candy breaks the surface tension of the soda, which is holding back the expansion of the carbon dioxide bubbles within. The pits all over the candy then provide nucleation sites for bubbles to attach. The heavy candies fall to the bottom of the bottle, forcing the bubbles -- and the soda -- to come gushing out of that small opening, forming a geyser! You can vary the reaction in many ways to create a super fun (and potentially messy) experiment. 

Thursday, June 7, 2012

Newsletter: Kaleidoscope is Back!

The monthly newsletter is back! Check out our June edition!

Salad Spinner Art and Science

To kick off the summer farmer's market season, I decided to do one of my kids' all time favorite art and crafts at my table: Salad Spinner Art. Everyone loves Salad Spinner art. Seriously. Grown adults like to stop and play as well.


It's a pretty simple concept. Select your favorite washable poster paints and thin them with a bit of water. Use a spoon, eyedropper (excellent for fine motor skills) or paintbrush to add drops, blobs and splatters of paint on a paper plate. Then put the plate into a salad spinner and spin it.


Viola! You have a beautiful piece of artwork. The key to success is to avoid putting too much paint on at once. That can be a real mess, and the colors just muddle together into a yucky brown. Some kids like to put colors on randomly. Other like to make patterns, which can yield great results. One girl painted her whole plate one color, then added drops over it, which looked a bit like tie dye when it was done. Another boy added color in layers, one at a time, which made some really lovely, subtle blends. 

If you're feeling really adventurous, lay down a thicker layer of paint and let it tack up a bit. Put the plate in the spinner and place a handful of marbles in there as well. Give it a spin, starting and stopping randomly, even shaking the spinner gently, and you'll get what I like to call "slug tracts." You can also put globs of thinned white glue, sprinkle on colored sand or glitter and spin it. (Use more than I did for the example below.) It's all kinds of awesome.


The fun thing is that you can make this a great little science experiment too. Here are some questions you can try to answer:

  • Does the thickness (viscosity) of the paint affect the artwork? the distance the paint moves across the plate? (For older kids, actually plan ratios of paint to water and test each on the same plate.)
  • Does the type of paint used affect the artwork? in what ways? (Compare poster paint, watercolors, acrylic, food dye...)
  • Does the speed of the spinning matter? Does it affect coverage of the plate? the shape of the artwork? the distance the paint travels on the plate? (Use a stopwatch to determine spins per minute. Older kids can test the effects of positive and negative acceleration, too.)
  • Does the amount of paint used affect the area of the plate covered after the spin? the shape of the final outcome? (Carefully measure teaspoons, tablespoons, etc.)
  • Does the type of plate used affect the artwork? (Compare uncoated paper plates to coated ones or styrofoam.)
And once you're done with that, give a go at exploring centrifugal motion! Your salad spinner can make a great centrifuge in a pinch. I just cut up egg cartons, glue or tape them together and add test tubes of various liquids. You can use small jars or the plastic tubs that sometimes come with bouquets of cut flowers, so long as you cap them well with aluminum foil and tape. Then fill each tube with an equal amount of liquid. (OJ with lots of pulp and vinaigrette salad dressings work particularly well.) For the best results, be sure to balance your centrifuge and SPIN! You're going to need to keep it spinning for a few minutes, so taking turns makes sense, but you will be able to get separation.


Anyway, it's tons of fun. I hope you'll get out your salad spinner today and have some fun. Be sure to post your artwork or the results of your experiments!


Tuesday, June 5, 2012

Button it!

In honor of 30 Days of Creativity, "global social initiative encouraging people to create stuff (anything) every day for 30 days in June," I've set up some crafty playdates for myself with friends. Yesterday, I got together with June Nezamis, my favorite math teacher in the whole world.

June pulled out a book she had picked up and wanted to try. It's called Button It Up: 80 Amazing Vintage Button Projects for Necklaces, Bracelets, Embellishments, Housewares & More. You see, June had recently come into a huge button stash, and wanted to put it to good use. Since I come from a long line of button hoarders myself, I was game.


We decided to make the cute little owl on the front cover. Unfortunately, the book didn't provide a template, so just traced the picture in the book onto plain white paper, folded it in half and cut it out.

Since we wanted to reuse as many previously loved materials as possible, we cut our owls out of retired jeans. Then we added our buttons and sewed them up. Instead of machine sewing the pieces together, we opted to use a blanket stitch for a decorative touch. We even found buttons to use as beaks!

They came out really cute, though clearly my template needs some work. I made the one the left.


This project is quick enough to hold the interest of fairly young kids and easy enough for beginners. Judging by the number of hugs and giggles my little guy got when I pulled him out of my purse for my daughters and their friends, it's definitely a hit! In fact my girls want to make their own this afternoon. And June plans to perfect her pattern to make some for gifts and, perhaps, even sell at craft fairs.

I can't wait to check out the other projects in the book. There are tons of jewelry ideas I can't wait to get my hands on. Button crafting could make great summer projects for the girls.

If you want some other fun project for buttons, there are plenty of ideas out there. For example, All Buttoned Up: 10 Fun, Functional, and Funky Vintage Button Projects has some simple projects to get you started.