| ||||||||||||||||||||||||||||
|

Friday, July 27, 2012
July 2012 Newsletter


Making boats: hull design
A friend recently invited me to her house to do a science experiment involving the stream that runs through her property. Well, that sparked about a million ideas! However, I thought we'd start with a fairly simple concept: boatmaking.
More specifically I wanted to focus on hull design: the watertight body of a ship or boat that meets the waterline. Hulls are generally divided into two categories: displacement hulls and planing hulls. Displacement hulls have a large underwater profile and tend to move slowly. Planing hulls are meant to ride high along the waterline, and can go fast.

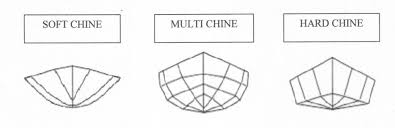
The shape of bottom of the boat is key to how it functions in water. Depending on what you want to do, you can build a boat with anything from a flat bottom to a rounded bilge to a hard chined V-shape. And of course, you can combine these basic shapes into a wide variety of composite shapes. Finding a balance that allows for a boat to carry the needed load while being able to move quickly and accurately is a tricky thing.
To further adjust the hull, a designer can add a keel to add stability or a rudder to help steer. You can also easily adjust the bow of the boat, the front or forward part of the hull. Changing this shape affects how well the boat cuts through the water, by reducing its resistance.
When you ask a child to draw a boat, they often focus on everything above water. After all it's what you can see easily. So getting them to think about the hull, and how it can affect the way a boat actually works, is a great change in perspective. And it makes for a fun engineering design project.
For materials I wanted something easy to manipulate, basically waterproof, and inexpensive. I like using things you can buy in the supermarket, because it gives kids the opportunity to keep experimenting at home without the need for special equipment. So I settled on wax-coated paper cups, an assortment of tapes and a stapler. I also provided some aluminum foil, but explained that they couldn't use the foil as their main design component.
I love working with kids, because you never know what they'll do. I assumed they'd cut up the cups, maybe use the flattened sides to build their designs. But instead they started creating displacement hulls and pontoon-style designs using the whole cups. Soon they were sharing designs, adjusting and improving their boats.


Once everyone was ready, we headed down to the stream to test our boats. First we used fishing weights to see how much load each boat could hold. Some were able to handle a pound or more! Then we let the boats take a run down an area of "rapids" while we timed the run with a stopwatch to see which moved most quickly. Several crossed the finish line in under 10 seconds, one in 7 seconds!

I was impressed with their determination. It started to rain when we headed down to the stream, but everyone stayed to test their boats. (What the heck, we were wet anyway!) However, the weather didn't give us a lot of opportunity to develop our boat design based on what we learned.
For students that want to extend the project, a soft wood like pine can be used to carve a hull. They can also experiment with buoyancy by using various types of wood in the same shape and size to see how the density affects how they float.
There is a lot of physics to be explored with boat design. We only had the chance to touch the tip of the iceberg. But for an overview of all the amazing engineering involved in boat design, check out the video below.
Or if you have an older, computer-savvy child, they may want to give some CAD a try with this virtual hull designer.
More specifically I wanted to focus on hull design: the watertight body of a ship or boat that meets the waterline. Hulls are generally divided into two categories: displacement hulls and planing hulls. Displacement hulls have a large underwater profile and tend to move slowly. Planing hulls are meant to ride high along the waterline, and can go fast.
The shape of bottom of the boat is key to how it functions in water. Depending on what you want to do, you can build a boat with anything from a flat bottom to a rounded bilge to a hard chined V-shape. And of course, you can combine these basic shapes into a wide variety of composite shapes. Finding a balance that allows for a boat to carry the needed load while being able to move quickly and accurately is a tricky thing.
To further adjust the hull, a designer can add a keel to add stability or a rudder to help steer. You can also easily adjust the bow of the boat, the front or forward part of the hull. Changing this shape affects how well the boat cuts through the water, by reducing its resistance.
When you ask a child to draw a boat, they often focus on everything above water. After all it's what you can see easily. So getting them to think about the hull, and how it can affect the way a boat actually works, is a great change in perspective. And it makes for a fun engineering design project.
For materials I wanted something easy to manipulate, basically waterproof, and inexpensive. I like using things you can buy in the supermarket, because it gives kids the opportunity to keep experimenting at home without the need for special equipment. So I settled on wax-coated paper cups, an assortment of tapes and a stapler. I also provided some aluminum foil, but explained that they couldn't use the foil as their main design component.
I love working with kids, because you never know what they'll do. I assumed they'd cut up the cups, maybe use the flattened sides to build their designs. But instead they started creating displacement hulls and pontoon-style designs using the whole cups. Soon they were sharing designs, adjusting and improving their boats.


Once everyone was ready, we headed down to the stream to test our boats. First we used fishing weights to see how much load each boat could hold. Some were able to handle a pound or more! Then we let the boats take a run down an area of "rapids" while we timed the run with a stopwatch to see which moved most quickly. Several crossed the finish line in under 10 seconds, one in 7 seconds!

I was impressed with their determination. It started to rain when we headed down to the stream, but everyone stayed to test their boats. (What the heck, we were wet anyway!) However, the weather didn't give us a lot of opportunity to develop our boat design based on what we learned.
For students that want to extend the project, a soft wood like pine can be used to carve a hull. They can also experiment with buoyancy by using various types of wood in the same shape and size to see how the density affects how they float.
There is a lot of physics to be explored with boat design. We only had the chance to touch the tip of the iceberg. But for an overview of all the amazing engineering involved in boat design, check out the video below.
Or if you have an older, computer-savvy child, they may want to give some CAD a try with this virtual hull designer.
Monday, July 23, 2012
Marshmallows flying!
It's just not summer if I don't break out the catapults and launch marshmallows around the Farmers' Market. So the other week, I brought this easy, classic science activity to Blairstown.
The design for this tongue depressor catapult from a really fun book called Mini Weapons of Mass Destruction by John Austin. I know it sounds dangerous, but with a little parental supervision most designs are quite safe for kids. And so much fun! It's engineering disguised as mayhem!


The design for this tongue depressor catapult from a really fun book called Mini Weapons of Mass Destruction by John Austin. I know it sounds dangerous, but with a little parental supervision most designs are quite safe for kids. And so much fun! It's engineering disguised as mayhem!
The basic construction is simple. You stack seven tongue depressors together and use two rubber bands on either end to hold them together. Then take two depressors and attach them with a rubber band on one end. Spread the two depressors into a "V" shape, and insert the stack lengthwise to make a "T" shape. Use another rubber band to secure the depressors together into your catapult. (The book gives clear, step-by-step instructions with diagrams.) For the original design, the author suggests using a hot glue gun to attach a bottle cap as a launcher, but I find it easier to just attach a disposable spoon with another rubber band or two. No electricity needed!

You can make the catapult with popsicle sticks too, though I find a stack of just five is enough. The popsicle sticks are thicker, and a bit harder to work with, but you can get the job done. I also like to make the coat hanger slingshot from the book too, and challenge kids to see which works better. The book has a whole chapter devoted to slingshots, catapults and trebuchets, so kids can have a lot of fun comparing results.

Then it's time to load a mini-marshmallow and get shooting! I like to give kids dixie cups that they can use to make towers. It's fun to knock them down. Dominos are also fun! For some Angry Birds action, paint your marshmallows red and green (or use leftover Christmas-themed ones, like I did here).


Another great catapult design that is easy to make and fun to tinker with comes from a great YouTube video I found years ago. This shoebox catapult is always a hit.
Spray paint and other watercolor fun
This week at the Farmers Market I decided to do something fun and messy: spray painting! But don't worry it's not what you think!
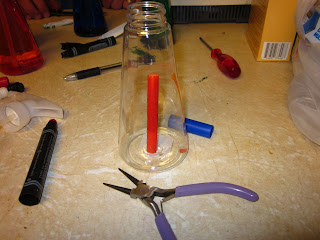
Obviously, I wanted to make sure my paints were non-toxic and washable, so I made my own. It's easy! I gathered up some old markers from around the house, used pliers to pop off the back, pulled out the felt and put it into an inexpensive 8 oz. spray bottle. Then I added water and gave it a good swish. Within minutes I had a cheap bottle of parent-approved spray paint ready to go. I let the colors sit over night to make sure they were nice and bright before using them. In other words: FREE PAINT! Great way to reduce, reuse and recycle.


At the market, I offered everyone stencils. It takes a light touch, but you can get a nice affect by spray in the paint over them. Of course, not everyone is interested in precision. Some kids wanted to just have fun mixing colors and seeing what happened! That's why I like to make sure I have all the primary colors available.


One regular KLC buddy, Brenden, mixed stencils, the spray paint, a spray bottle of water and washable markers to make some really neat artwork.

To look at the process from the other side, I offer kids coffee filters. They used washable markers to make designs, then sprayed with plain water, causing the ink to spread and blend. It's a lot of fun. I especially like using the black marker, because all the pigments separate, showing the blues and greens that make up the black ink. This is a really fun way to introduce children to chromatography!


For older students, you can use permanent markers, like Sharpies, and alcohol to create the same effects. Try it on fabric and you can make awesome faux tie dye shirts!
Obviously, I wanted to make sure my paints were non-toxic and washable, so I made my own. It's easy! I gathered up some old markers from around the house, used pliers to pop off the back, pulled out the felt and put it into an inexpensive 8 oz. spray bottle. Then I added water and gave it a good swish. Within minutes I had a cheap bottle of parent-approved spray paint ready to go. I let the colors sit over night to make sure they were nice and bright before using them. In other words: FREE PAINT! Great way to reduce, reuse and recycle.


At the market, I offered everyone stencils. It takes a light touch, but you can get a nice affect by spray in the paint over them. Of course, not everyone is interested in precision. Some kids wanted to just have fun mixing colors and seeing what happened! That's why I like to make sure I have all the primary colors available.


To look at the process from the other side, I offer kids coffee filters. They used washable markers to make designs, then sprayed with plain water, causing the ink to spread and blend. It's a lot of fun. I especially like using the black marker, because all the pigments separate, showing the blues and greens that make up the black ink. This is a really fun way to introduce children to chromatography!


Subscribe to:
Comments (Atom)