Tuesday, April 30, 2013

5 Things Your Young Business Person Needs to Know

The next session of TREP$, the exciting entrepreneurship program for 4th through 8th graders, is about to begin. The initiative is designed to serve as an inspiration for young people to think creatively and to put their ideas into action by creating a new business.

Over the last two sessions, we've all learned a lot about being a young entrepreneur. Here are some tips, from my own young businessperson, Caitie, who is co-creater of Spa Girls, a business that been successful at two TREP$ Marketplace events with their all-natural bath salts, lip balms and body sprays.


  1. Don't underestimate yourself. Never assume you aren't making something worthwhile. Try to make the very best product you can, so that you can wow your customers. Make a little more product than you think may sell, and trust that you will find a way to make the sale if you are creative and persistent.
  2. Don't undervalue your time. Making quality products or providing good services takes time and hard work. Remember that your time is valuable and important. Consider it when you set your prices.
  3. Don't reinvent the wheel. Make something new and special. Make something that is unique. Or put your special spin on something that exists. Whatever you do, make it yours. That makes it something the customer will want.
  4. Always wear a smile. Be professional. Wear your best clothes and don't eat stinky foods. You want to present yourself well to your customers. Customer service is very important. 
  5. Pricing is important. Charging too much or too little can mean you lose sales. Aim for the middle. See what other companies change for similar products or services. Be very aware of how much money you've invested, and plan to make back your expenses by the time you sell half your inventory.

Gwen, my 7 year old, also wanted to throw in a tip as well. She says, "Little sisters and brothers make great assistants!"


Tuesday, April 2, 2013

Hot and cold reactions

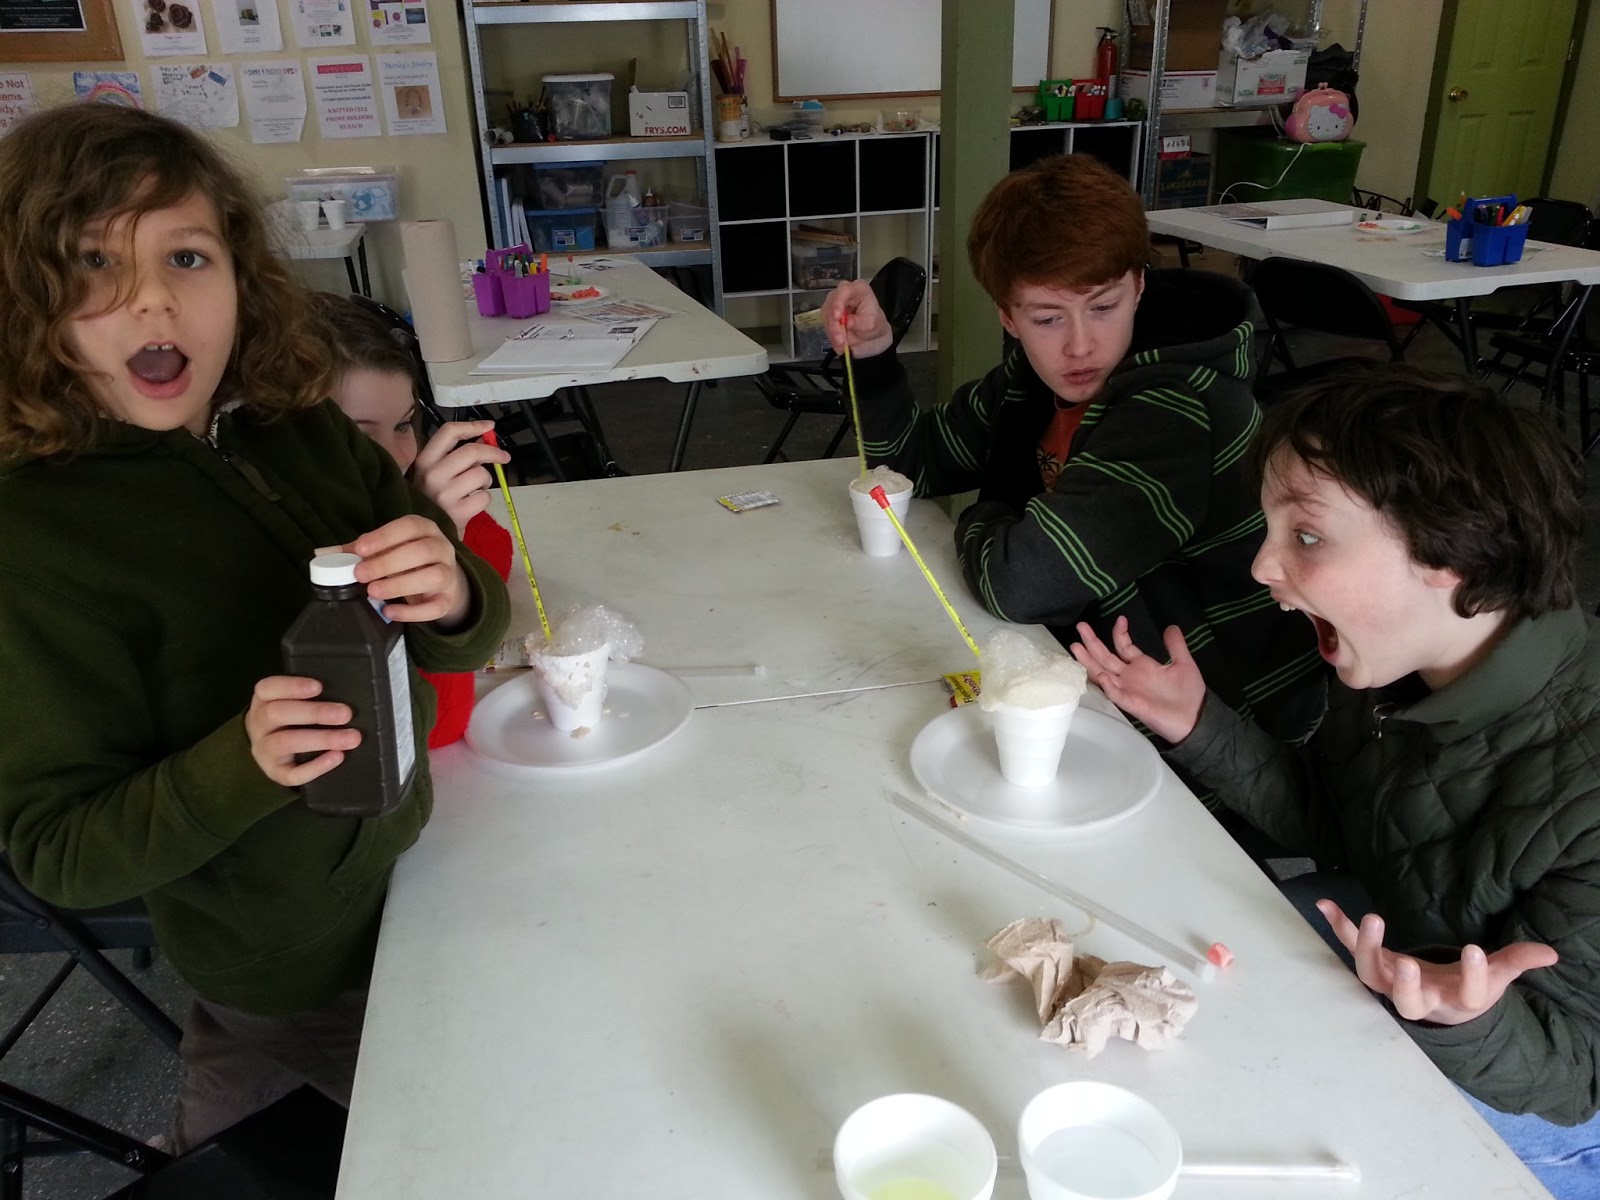
As part of our recent Chemical Reactions Workshop, we explored endo- and exothermic reactions. Many chemical reactions create light, heat or other forms of energy. An exothermic reaction is one in which heat is made and released by the reaction. The term is obvious if you look at the roots: ex = out/outside, therm = heat. Therefore, endothermic (en = in/inside) is a reaction where energy (in the form of heat) must be pulled in for the reaction to occur.

Both are fun and easy to demonstrate. Grab the following supplies:

  • 2 Styrofoam cups (reusuable insulted cups are even better)
  • 1 thermometer
  • baking soda
  • citric acid (you can find it with the canning supplies in the grocery store)
  • hydrogen peroxide
  • a packet of yeast
For the first reaction, create a baking soda solution by adding baking soda to warm water one teaspoon at a time, stirring after each addition. Stop when no more will dissolve. Let the solution cool to room temperature, then place it in your cup. Use the thermometer to check the temperature. Add a teaspoon of citric acid. The solution will fizz and the temperature will drop. Keep adding citric acid and see how low you can make the temperature go. This is an endothermic reaction. Kids can put their fingers into the solution to feel the cold directly. Just wash your hands afterwards.


For the second reaction, we're going to generate heat through a decomposition reaction. Fill your cup with hydrogen peroxide. Check the temperature. Slowly add the yeast, a little at a time. Soon you'll have a big bubbling mess and spike in the solution temperature. Keep feeding the reaction. How high will the temperature go? Again, kids can touch the solution without fear. 


Older student may enjoy exploring the concepts of enthalpy and entropy as well. Have fun playing! Let me know what you discover!

Friday, March 29, 2013

Metal reactivity awesomeness

So, one of the things you talk about in introductory chemistry is the activity level or reactivity of different materials. Because reactivity tends to mean fizz, flash and boom, the visuals often make for great demos. Specifically, the activity series of metals can be instructive, as you can use it to predict how different metals may react in similar reactions.


This experiment is an oversimplification, I know, but it gets idea across for younger students.

Here I react three metals -- aluminum, zinc and copper -- with the commonly available muriatic acid (hydrochloric acid). It's a cheap and easy way to visualize the reactivity of different metals, using easy to find materials. Plus, it's fun. To extend this, you can try different metals, for example an iron nail. See what you have in your home or lab. Then look at an activity series chart and the Periodic Table and draw conclusions.

Safety notes: This reaction produces noxious gas and heat. Goggles and gloves should be worn. Seriously.

Sorry for the video quality. First time with a new camera. Plus I have a sinus infection, so my voice sounds terrible.

Wednesday, March 27, 2013

Making Matters: 5 things to do with paper towel rolls

We all know that toilet paper and paper towel rolls are one of the all-time classic craft supplies in the typical classroom. Which is awesome -- I love toilet paper owls and other fun projects made from these upcycled marvels. But what about using such humble supplies for science? Here are five projects
to try at home.

Ok. One toilet paper roll owl. I can't help myself.
  1. Marble Slides -- Break out the masking tape and get ready to have some fun! Using whole and halved rolls, junior designers can attach tubes to any wall creating multi-layered slides for marbles to zig-zag towards the floor. If you want to get some motion going, try attaching rolls to foam board using brass brads or tacks!
  2. Spectroscope -- Find all the colors of the rainbow in white light. Using black construction paper, cut a circle the size of the paper towel roll opening. Cut this circle in half. Tape half of the circle to one end of the roll, being sure to tape well around the edges. Attach the other half circle to the same end, leaving a narrow slit across the center. Again, tape well at the edges. Now,with your eye at the open end, look at a CD held near a light source (an incandescent bulb just behind the bulb is great). The CD will diffract the light, breaking it into a rainbow that you can see through the slit. Wow!
  3. Kaleidoscope -- Cut you paper towel tube to 8 inches. Longer will make it tough for enough light to travel to the eye. Use black construction paper to cover one end of the tube. With a pencil, poke a hole in the paper. Use clear tape and apiece of clear cellophane or acetate (a report cover, a transparency, etc.) to create a triangular tube that will fit inside the tube. Slide it in. Cover the other side of the tube with plastic wrap, pushing it down to make a little pouch and securing it with tape or a rubber band. Add beads, sequins, gems or anything small and shiny. Cover with another piece of plastic wrap and secure in place. Now hold it to the light, look through the hole and enjoy the power of reflected light as it creates an amazing display!
  4. Telescope -- Using construction paper create a roll that can just fit inside the paper towel roll. Ideally, you'll want two double-convex plastic or glass lenses, one 150 mm and the other 300 mm. If you can't come by those, try magnifying glasses - one larger and weaker and the other smaller and more powerful. You may have to experiment with different options. Tape the smaller lens onto the construction paper tube. Tape the weaker one onto the cardboard tube. Then fit the open end of the construction paper tube into the open end of the cardboard tube. Look through the stronger lens. Move the construction paper tube in and out until the object you're looking at is focused. 
  5. Pulley Towers -- Grab some old thread spools, bamboo skewers, cotton string and toilet paper rolls to explore one of the most fun simple machines. Use the rolls to make two towers -- feel free to go big, stacking two of three rolls together. To form the base, cut slits into the bottom of the tower, spread out the "feet," then tape them to a table. Thread the spools onto the skewers and place them between the towers, poking holes into the cardboard as needed. Then it's time to play! Use the string wound in various ways through the pulleys to see how the number and placement of affects the what you can lift.
    That is one complicated pulley system!
Whew! That's a lot of fun with paper towel rolls. I'm going to take a bit of break. Come back later this week for 5 MORE fun ideas!

Thursday, October 11, 2012

TIC Supplement: Where Trout Live

Angler on the Paulinskill River
An angler on the Paulinskill River. 


Though our eggs didn't arrive as expected, we took time this Tuesday to learn about the trout we'll be hatching. This week we focused on how the tank and the stream were alike and different. First we reviewed the parts of the tank, looking at the chiller that keep the water at a steady 52 degrees Fahrenheit and the filter that keeps the water clean. Students noticed that the tank had cold water, gravel and bubbles for oxygen, just like the stream, but that it didn't have sand, silt, plants or other life in it. (Learn more about trout habitats.)

Those are really important observations. Right now, one of the most important things we need to do is build the bacteria colonies in our tank. That surprised the students! After all, aren't bacteria the things that make you sick?

Well, not all bacteria are bad. Our trout will need the bacteria to help them digest food, keep their scales and skin healthy and to decompose wastes, just like we do! So we've been adding special bacteria from a bottle to our tank for weeks, which helps the filter create a healthy colony. (Learn more about creating beneficial bacteria colonies in fish tanks.)

But we wanted to customize our bacteria. We want to create a tank environment that is as close to the environment that the fish will eventually live in when they are released into the Paulinskill River in May.

Rainbow trout swimming in a gravel-bottomed stream.

So we took a walk to Footbridge Park to visit the Paulinskill. The Paulinskill River is a  41.6-mile tributary of the Delaware River, formed when the Wisconsin Glacier melted 13,000 years ago. It begins just north of Newton, NJ and ends near Columbia, where it feeds into the Delaware. (Learn more about the Paulinskill.)

At the river we collected water samples and algae-covered rocks. By transporting them back to Kaleidoscope and adding them to our tank, we'll be able to transfer some of the microscopic life, including bacteria, to our artificial habitat!

When we got back to KLC, we poured some of our water onto white paper plates. There we used a digital microscope to look at the water. We saw lots of sediment, algae and even a few moving creatures, likely small bacteria, protists, insects or crustaceans. (Learn more about what lives in "pond scum.")


We can't wait until our eggs arrive next week on Tuesday, October 16 after 9:15 am!

Lesson extensions:
  • Have students draw the tank, labeling items like the chiller and filter. How much do they remember? What do the components do? What part of the stream environment do they mimic? They can check their drawings for accuracy next week! (Here are some examples that are similar to our tank.)
  • Go to a local river (or back to the Paulinskill) and do a scavenger hunt to explore the water and the surrounding Area. Use this worksheet to track your findings.
  • Describe a Dream Stream.
  • Watch "The Way of the Trout" and describe a trout habitat. What animals and plants are present? What are the trout’s prey? What are the predators?
  • Explore how glaciers form rivers like the Paulinskill. For a simple experiment fill an ice cube tray half full of water. To each cube, add various sediments like dirt, sand, gravel and rocks. (I would suggest two each with a single type of sediment, then several mixed samples.) Top off with more water as needed. Leave some cubes as just water. Freeze the cubes. In the morning, press out modeling clay into flat discs. Take each cube and drag it along the clay. Use different amounts of pressure. Go slowly, then quickly. Record your findings and draw or photograph examples of the results. Which looks like a river or valley to you?

Tuesday, September 18, 2012

Go Fly a Kite

A few weeks ago, the weather report said that it was going to be really windy. Since it was a Farmers' Market day, I thought kites would be an excellent idea!

We used paper bags to make box-style kites. The process is really simple. Decorate your bag. Punch four holes in the corners of the open end of the bag. Tie string in each hole, then take those four strings and knot them together at end opposite the bag. Tie on a long piece of string for you to hold. Then add lots of fun streamers to the closed end of the bag (using glue or a stapler). Voila! A kite!


Kites are a great way for kids to explore aerodynamic forces. Kites work by blocking the normal air flow, forcing the air around the kite. Air passing under the kite is moving more slowly than the air over the kite, creating lift.

Of course, I knew that one craft is never enough, which is why I brought a bunch of silly face stickers too. That way we could make puppets!


It was a lovely day, made more wonderful with music. My daughter, Caitie, especially loved the band. That young man in the center of the picture below is her fourth grade teacher!


Ice play at the Farmers' Market

Since the weather is getting colder, and my kids are already looking forward to sledding and snowballs, I thought I'd bring some ice to the Farmers' Market this week for some frozen fun.

My favorite thing to do with ice is super simple. I give each child an ice cube and a piece of string. I challenge them to pick up the ice cube with the string without touching the cube with their hands. After giving them a few minutes to attempt the task, almost none are able to successfully pick up the ice. (Abby, below, was the only one who was able to do it, by waiting for the ice to wet the string well, and carefully sliding the string under the entire length of the ice cube.)


But I have an easier way. I drape the string across the ice and sprinkle it with salt. After a little bit, the salt has melted the top layer of ice. However, the water quickly refreezes as the salt dilutes and the ice itself wicks away heat from the water layer. The result is that the string is frozen into the ice! You can lift it easily. It's one of the oldest magic tricks in the book.


There are so many science experiments you can do with ice. Challenge the kids to create ice that is perfectly clear... or completely cloudy. Ask them which freezes faster -- hot water or cold. Try freezing tap water, distilled water and salt water to compare results. Have an ice melting contest and come up with lots of methods for melting ice as fast as you can. the possibilities are endless!

Of course, I wanted to have some artsy fun too. So I diluted some of my washable tempra paint with water and put it into some fun ice cube trays. I covered that with foil and placed Popsicle sticks into each one. (The foil helps hold the Popsicle sticks straight up.) When they were frozen we used the paint Popsicles as brushes to crate out own artwork!


Of course, the kids quickly came up with their own ideas! They sprinkled salt on the paper, after painting it, to create speckled patterns. That was fun. Then Henry took a piece of paper towel and made a print! Even when the ice melted, we still had a good time splashing the paint around.


So I hope you'll have some fun playing with ice!