Showing posts with label fall. Show all posts

Wednesday, October 16, 2013

Ten Easy, Cheap Crafts for Fall

At the Farmer's Market this week, I was asked if I had ideas for simple, inexpensive crafts kids could do at upcoming Halloween and Thanksgiving events. Are you kidding? Of course, I do!

So here we go: Ten Easy, Cheap Crafts for Fall!

1. Paper Plate Scarecrow Faces -- Make them pretty, or make them spooky; either way this craft is a ton of fun for everyone. Just use standard paper plates as the head. Cut triangles of colored paper for the hats. Googly eyes add a lot of fun, and the rest of the face can be drawn on. Strips of paper or some raffia make great hair. That's it! Let the kids get creative!


2. Paper Plate Jack-o-Lanterns -- This is a classic, but I have an update to make it so much easier and less messy! Usually you'd paint the plate a bright orange, let it dry, and then attach the elements for the face. But that takes a lot of time. Instead use squares of tissue paper attached with a glue stick! You can buy them precut or make your own easily. Then just add construction paper eyes, nose and mouth. So easy!


3. Toilet Paper Roll Owls -- Folded and cut cupcake liners become wings and feathers when added to a toilet paper roll using a glue stick. Use markers to add a cute face. And of course, googly eyes. I just love googly eyes. A little black paint or a black marker, and these make great bats too!


4. Toilet Paper Roll Mummies -- I found this idea on Pinterest, and it's just TOO cute! Just wrap a toilet paper roll in tissue paper, gauze or, well, toilet paper, using a glue stick to keep it attached. Use twine or yarn to add texture. Top it off with googly eyes. Ta da! Perfect little mummies!


5. Duct Tape Spider -- Everyone loves duct tape crafts! This one, from Leisure Arts, is so simple, just about anyone can pull it off. Use newspaper or a plastic bag to create a ball, about the size of an adult fist. Squish it a bit to flatten it. Use a bit of masking tape to secure this ball. Cover with duct tape. Take four pipe cleaners and twist them together in the center to form a bundle, then tape them to the underside of the spider. (Cover them with additional duct tape for extra drama.) Add googly eyes and your have a great creepy creature. Tip: Use solid color duct tapes if you're on a budget. You get more tape per roll.


6. Pine Cone Turkey -- Dip colorful feathers in Elmer's Glue and attach them to the wide end of a pine cone. Use a little Model Magic clay to form a head. A small piece of corn makes a great beak. Attach eyes, have a great decoration for your table! Don't have clay? Try this version of a turkey without it.


7. Lots of Leaf Crafts -- You can do SO many things with just the leaves from your back yard! Just collect a tons of pretty dried leaves. From there you can create a tons of great crafts. Start by pressing them in between sheets of clear contact paper for bookmarks or punch a hole to string them on yarn as a necklace. Or use glitter glue to lightly coat the leaves for sparkly garland or necklaces. Or lightly coat the leaves in paint and press them to paper as stamps. You can also place them under paper, vein side up, and use crayons to create rubbings. Cut the center out of a paper plate and use glue to attach leaves around the rim, creating a pretty wreath. And then there is my personal favorite: Attach the leaves to mask shapes, cut from card stock. Add feathers, plastic jewels and stickers to create fabulous masks. Use ribbon wear it, or attach to the popsicle stick for a held version.


8. Corn Prints -- Kids love breaking out the paint. Why not give them something fun to paint with? Try taking dried corn on the cob (like Indian Corn), rolling it in paint, then rolling it or pressing it onto paper. You can make tons of great patterns this way. While you're at it, cut open an apple and use it as a stamp. Try using things like gourds and acorn squash as stamps too.


9. Corn Bin -- This one is great for younger children and provides a wonderful sensory experience. Just fill a bin with feeder corn (a.k.a. deer corn) and hide all kinds of fall themed items in it. Then they can go on a treasure hunt.


10. Monster Paper Bag Puppets -- This craft couldn't be simpler. Give kids lunch bags. (I like the plain brown or white versions, but colored bags, sold as party gift bags are lots of fun too.) Print out some fun monster face pieces, like these free ones. You can just use regular paper and a glue stick to attach, or print them onto sticker paper. Use additional stickers, markers, sequins, plastic gems, feathers, etc. to add bling.


So I hope these fun crafts make your holiday parties and events more fun and creative. Enjoy!

Monday, October 31, 2011

Happy Halloween Lunch!

As I believe I have mentioned before, I LOVE Halloween. So of course, I wanted to do something special for the girls when I packed up their lunchboxes on October 31st!

I started with the citrus. It's really easy to use a sharp knife to carve little jack-o-lantern faces into the rind of oranges or clementines. They'd dry out if you left them out for too long, but they'll survive to lunch time without a problem.


Next up, the main event: a classic PB&J turned into a spooky ghost. I just made my usual sandwich, being sure to use gooey strawberry jam. Then I cut with a favorite cookie cutter. Use a little peanut butter to stick on dried cranberries as eyes and place into the reusuable container with black bean chips to create a backdrop. (I used scraps of wax paper to secure everything into place when I packed it up.)


On to the treats! I pulled out my cookie cutters again to cut a piece of cheddar cheese into the shape of a bat. Then I wrapped up some roasted pumpkin seeds in a bit of wax paper (secured with invisible tape) and topped the packet with a cute sticker.


Once that was all packed up, I made some quick Happy Halloween cards. I just ran premade cards through my embosser, inked the front to add depth and then added some sparkly stickers. I stamped the inside with a sentiment and wrote in "Love, Mommy and Daddy!" I slipped that into the lunch box and called it a day. Happy Halloween!


We have to do something equally fun for dinner. We're planning Hotdog Octopi in tomato sauce, served with sliced orange and green bell peppers. Should be pretty creepy and super quick, so we can get out to trick-or-treat!.

Saturday, October 29, 2011

Let It Snow? Caitie's Photo Blog


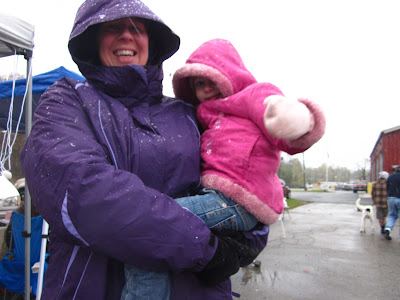
On the last day of the Blairstown Farmer's Market, a big Harvest Festival was planned. Pig roast, trick or treat, great crafts! And then the weather man predicted snow. Did the festival get postponed or cancelled? Heck no! Intrepid souls showed up and set up, defying the oncoming storm! "You may be right, I may be crazy..."


So I handed my 8-year-old daughter, Caitie, my camera and set her out to take photos of the a truly unusual day. This is the kind of experience that our kids will still be talking about 40 years from now. "Remember when we went trick-or-treating in the snow at the Farmer's Market??


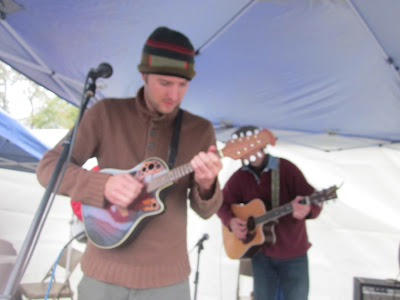
Despite the crazy weather, the event pushed on, keeping pretty close to schedule. The crafts, the pig roast, the bluegrass band...


Despite the cold, the vendors kept on selling,as if it was perfect summer's day, making sure the brave, winder-clad customers got all that they needed, despite the weather...


As for the kids, they had a fabulous time! They had snowball fights, caught snowflakes on their tongues, danced and just generally had a blast, despite how wet and cold they were. The dogs and the adults seemed to have a pretty good time too. 


So, it was weird day, but a good day. A magical day. The only downside was that we had to pack up early and didn't get to say goodbye to all the friends we'd made this season. But hopefully we'd traded information, or would be getting together for the winter market. What a crazy end to another wonderful year of the Blairstown Farmer's Market!

According to Caitie, "This is a day I'll always remember." That is a good, good thing!


Friday, October 21, 2011

You don't scare me!

I love Halloween. Seriously, I love it. Taking on a new persona for a day. Planning a costume for months. Making creepy decorations. Transforming my home into a spooky scene. And let us not forget the chocolate!

When I had my daughter, Caitie, I made her the cutest darn Winnie-the-Pooh costume for her first Halloween. Oddly enough -- what with nursing constantly, changing a neverending stream of diapers and constant sleep deprivation -- I didn't get much time to decorate. But I did (re)discover the cute in Halloween. All was well.

That was, until the following year. Caitie was about a year and half old. As she played in the leaves, I decorate the outside of the house with my standard grim reaper and giant spider. The problem was when she stopped playing in the leaves and saw my morbid creation... and burst into hysterical tears. Clearly, Caitie did not enjoy the dark side of Halloween.

My reaper and spider were sent to languish sadly in the garage. And we went off to the local department store for some happier decorations. Caitie chose colorful, smiling, corn-husked scarecrows. Happy and cheerful. Not my vision of Halloween, but what can you do?

So, for years my yard has been a haven for wrangly, dangly scarecrows. The collection has grown, because I can't help but throw myself into anything Halloween. On top of that, I have made pretty fairy and princess costumes by the ton. The glitter. The rhinestones. The pink tulle. It may not be a horror show, but Caitie -- and her little sister, Gwen -- understood the most fun premise of Halloween. It's your opportunity to transform. And eat chocolate.

Last year, something odd began to happen. You see, Gwen is not Caitie. (Kids have a weird way of becoming individuals.) Gwen fell in love with the movie "The Nightmare Before Chirstmas." Gwen likes spooky. She likes scary. She LIKES grim reaper decorations! Granted she still wanted to dress up as a fairy, because that's what her older sister was doing, but a shift was certainly happening. Scarecrows beware!

Which brings us to 2011. Gwen is helping me make a scary mummy costume to wear this year. Caitie actually wants scary decorations. They want a jack-o-lantern with the face of a wicked witch. Suddenly, we all agree on Halloween! I can pull Ole' Grim out of the garage! Oh glorious day!

Then my mommy brain stepped up, late one night. She had noticed that my girls, Caitie especially, were growing up. Caitie now had bigger fears than plastic spiders. Real fears. Fears of fitting in. Fears of doing well at school and remembering all her lines for her play. Fears of being pretty enough, or smart enough, or both. I can calm many of those fears and help her learn to process them, face them, overcome them. But they are real. The transformation from toddler to big kid is real.

Soon she won't want to trick or treat with me anymore. She'll want to be with her friends. She won't want me to make her costume with her. She'll just do it on her own. Or buy one at Party City. And soon, far too soon, she'll want to skip Halloween all together, because it's not "cool."

So this year, I still put out my scarecrows, right along side the reaper and the spider. I'm trying to squeeze every moment of Halloween fun from the end of the month. Time is precious. Time with my girls is my harvest. And those scarecrows remind me of how quickly childhood can pass.

I think it's time to build some new scarecrows of our own. Of course we can take out some old clothes and stuff them. I've found that grocery bags filled with newspaper and attached to a frame of 1x2 wood with duct tape works well, and is easy to recycle later. For inside I want to make miniature versions. Since I always seem to have popsicle sticks and leftover fabric around, I think I'll try this Wee Scarecrow Craft from About.com.